前两天大学室友大佬明跟我说,xx,我有项目要做借用你的80端口用几天,随后各种骚操作(后来据说是用iptables转的)把整台服务器80端口全部转走到8080,由于我的blog走的http所以导致我的blog直接也挂掉了!此时想到办法就是用Nginx配置二级域名做一次反向代理。
Nginx—-世界上最好用的反向代理服务器。
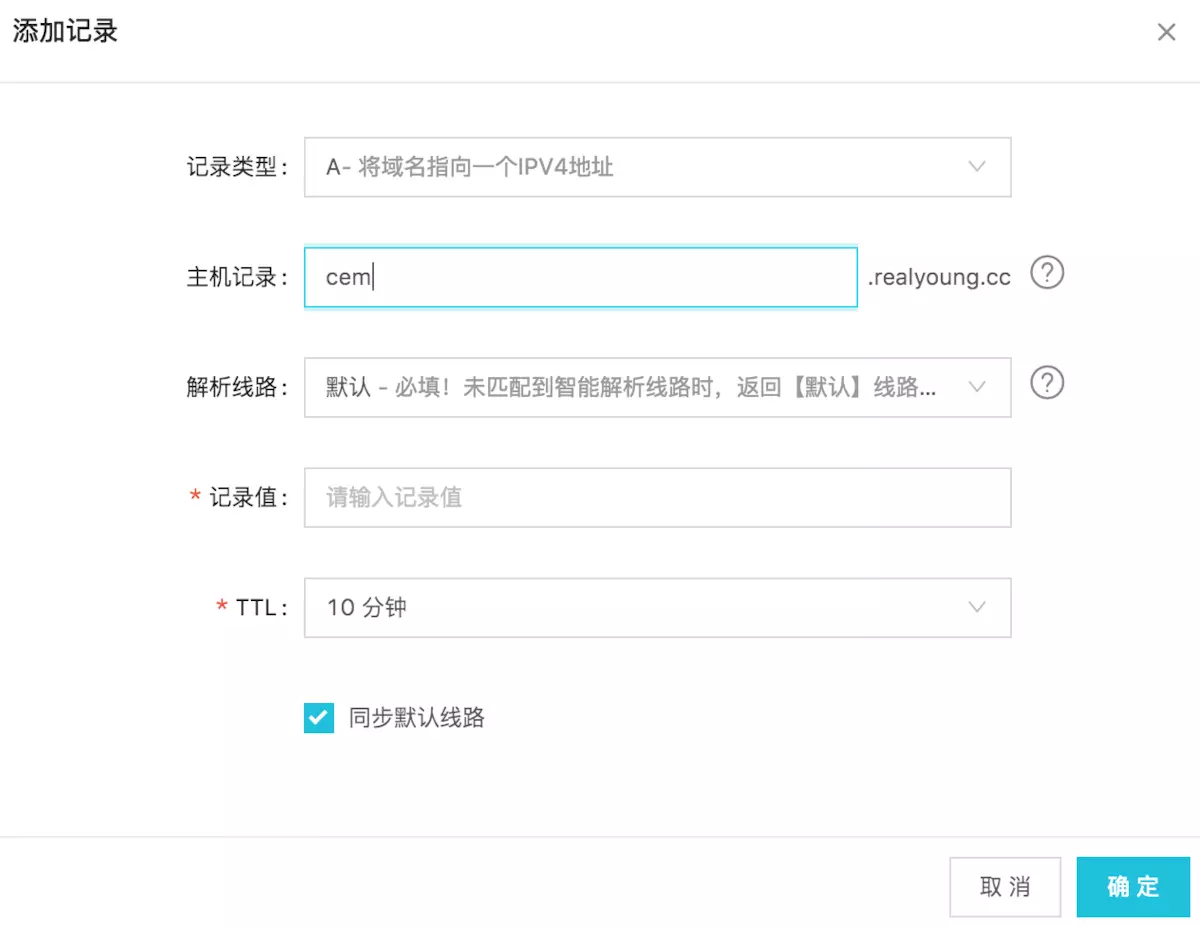
首先先到域名后台配置一个二级域名的A记录解析,例如:cem.realyoung.cc 没有域名的话直接用ip地址
然后在服务器上添加一个 vhost
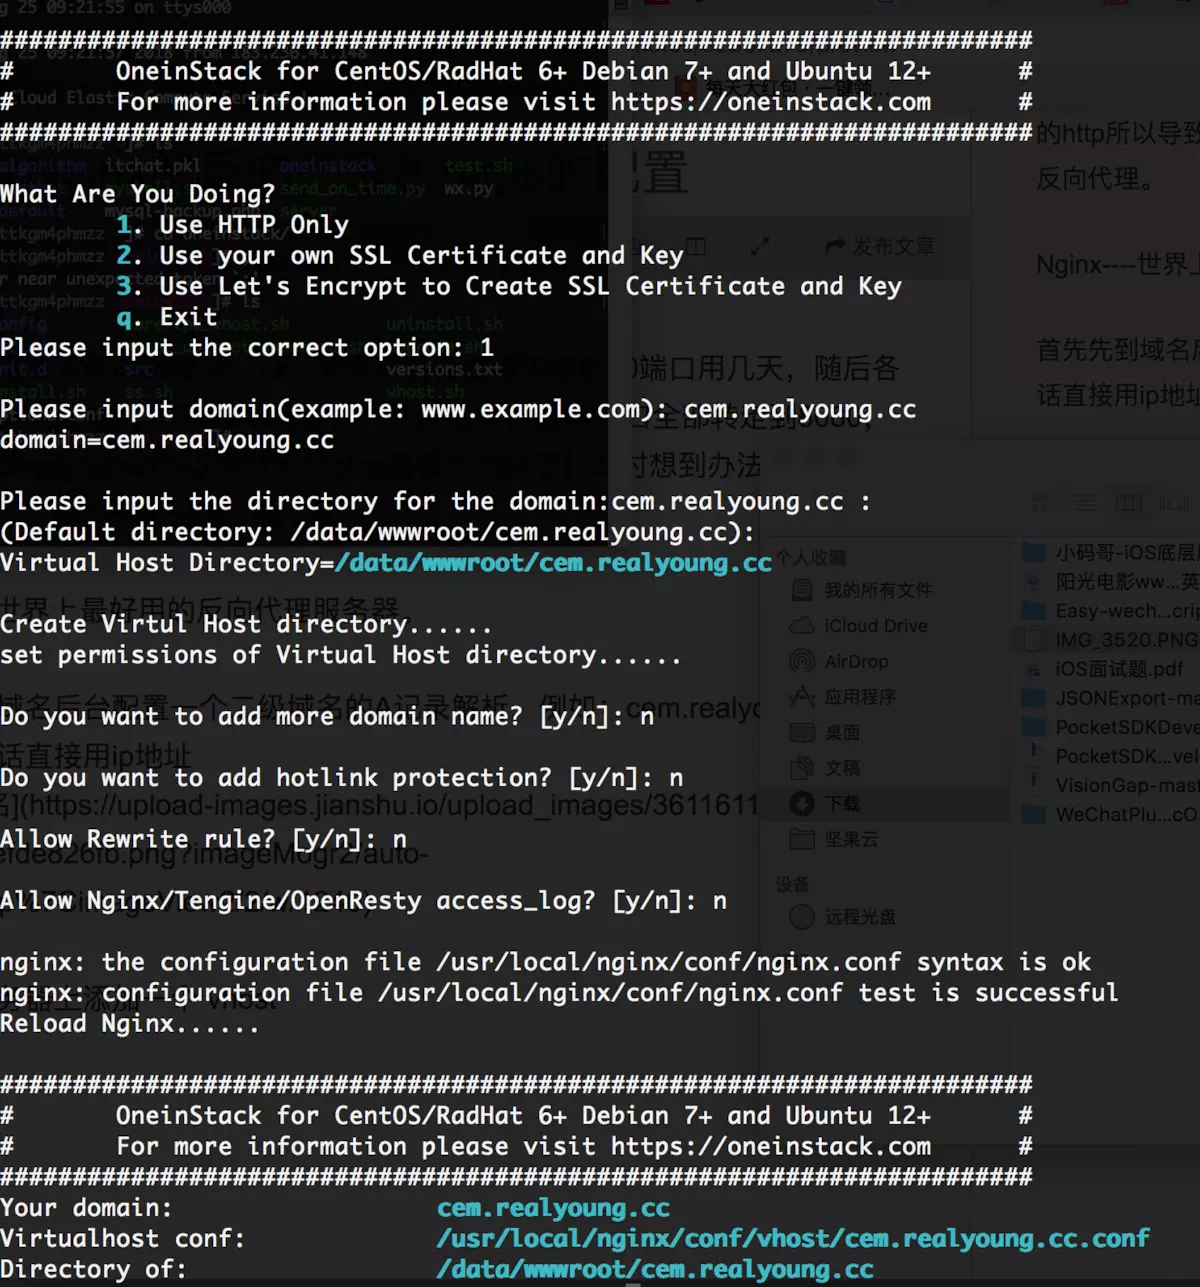
这里我直接用的二级域名做解析,想用ip地址 直接把vhost的
domain 写成ip地址即可
随后配置该 vhost 的Nginx配置文件,配置如下
upstream cem {
    server 127.0.0.1:8080;
}
server {
  listen 80;
  server_name cem.realyoung.cc;
  access_log off;
  index index.html index.htm index.php;

  #error_page 404 /404.html;
  #error_page 502 /502.html;

  location / {
    proxy_pass http://cem;
    proxy_set_header Host $host;

    }
}
由于是直接代理到本机,便是127.0.0.1:8080,小伙伴们可以尝试代到别的主机试试,随后确认安全组开启8080,重启Nginx:nginx -s reload,浏览器输入二级域名,搞定!
此外,觉得这次80端口被截走也太扯了,换个思路,把网站顺便升级到 https(记得安全组要开启443端口),EFF(电子前哨基金会)为了推广https协议,成立了一个项目并且免费发放证书!开发者的福音啊!点击跳转到该项目的github地址,我们需要做的就是把它 clone 下来
git clone https://github.com/certbot/certbot.git
随后先停止Nginx,一定要先关掉Nginx nginx -s stop,不然会一直报错!
cd certbot
./certbot-auto certonly --standalone --email yourEmail(你的邮箱!)  -d yourDomain(你的域名)
如果提示没权限的话,请sudo chomd u+x certbot-auto
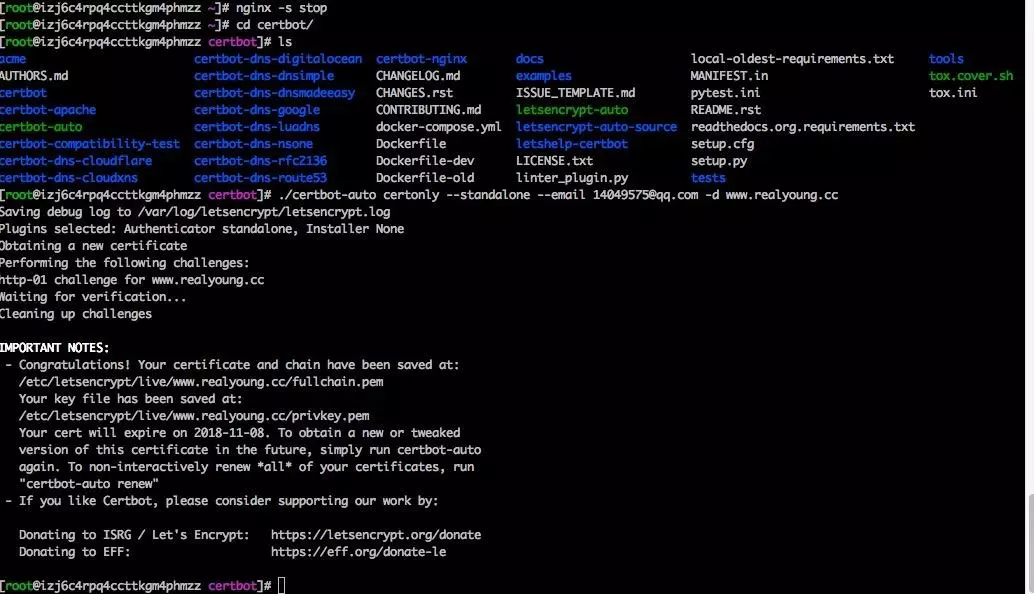
到此出现 Congratulations,便是添加证书成功了,这里还会告诉我们证书的存放地址,默认都是在 /etc/letsencrypt/live 下,你可以拷贝到别的地方或者做一个软链接,这里我暂时就没动它,直接到Nginx里面配置该路径了,并且做了一次301重定向都跳至https,配置如下:
server {
  listen 80;
  listen 443 ssl;
  ssl_certificate /etc/letsencrypt/live/www.realyoung.cc/fullchain.pem;
  ssl_certificate_key /etc/letsencrypt/live/www.realyoung.cc/privkey.pem;
  server_name www.realyoung.cc;
  access_log /data/wwwlogs/www.realyoung.cc_nginx.log combined;
  index index.html index.htm index.php;

  root /data/wwwroot/www.realyoung.cc;

  include /usr/local/nginx/conf/rewrite/wordpress.conf;
  #error_page 404 /404.html;
  #error_page 502 /502.html;
if ($ssl_protocol = "") { return 301 https://$host$request_uri; }
if ($host != "www.realyoung.cc") {

    rewrite ^/(.*)$ https://www.realyoung.cc/$1 permanent;
    break;
}

  location ~ [^/]\.php(/|$) {
    #fastcgi_pass remote_php_ip:9000;
    fastcgi_pass unix:/dev/shm/php-cgi.sock;
    fastcgi_index index.php;
    include fastcgi.conf;
  }

  location ~ .*\.(gif|jpg|jpeg|png|bmp|swf|flv|mp4|ico)$ {
    expires 30d;
    access_log off;
  }
  location ~ .*\.(js|css)?$ {
    expires 7d;
    access_log off;
  }
  location ~ /\.ht {
    deny all;
  }
}
随后重启Nginx,浏览器输入地址便可看到已经有https了,至此 https 配置结束。

再记一下踩的一个坑
在配置https的过程中,出现了一次 ERR_SSL_PROTOCOL_ERROR 导致网站一直进不去,后来查明原因是因为我在Server的配置中只写了 listen 443;
解决方法就是添加上 ssl 协议 :listen 443 ssl;
作者:Real_young
链接:https://www.jianshu.com/p/8cfd91a0213f
来源:简书
著作权归作者所有。商业转载请联系作者获得授权,非商业转载请注明出处。
 自由阿草
自由阿草

